NOTE: Tactical words bolded for high speed low drag reading.
On a recent surf fishing trip, I brought along one of Magpul’s new sand color PMAGs. I ran this peice of kit through rigorous high speed low drag trials to see if it is up to the tactical demandsof a surf fishing operator.Initial testing indicates that these PMAGs are less noticeable on the sand than black PMAGs 40s.
Scientific trials were conducted by placing a black PMAG 40 and a Sand PMAG 30 near the edge of the surf where beachgoers were likely to walk.
Observations indicated that subjects (n=1) were 100% more likely to trip over the sand colored Pmag. Therefore it is assumed that sand colored PMAG are 100% less visible in a beach environment.
Subject was interviewed after the experiment and was quoted as saying “I hope you got that because I’m not doing it again”
Where did my AR pistol go?
Over at guns.com they ran a story about a new digital trigger prototype. There is not a lot of info on how it works other than “an electronic signal releases the trigger.” From watching the video below I’d speculate it’s activated when the trigger which just pivots on the trigger pin and spring hits the little blue button behind the trigger.
This certainly won’t be service rifle legal in the foreseeable future. Electronic triggers are not uncommon in the paintball/airsoft world it will be interesting to see if they catch on outside of a novelty . What do you think?
I picked up a nice free float rail from ALG defense, so I needed to take the barrel off of my Palmetto State Armory (PSA) mock dissipator. Sounds easy right? Well not so much. Using my improvised upper clamshell and multi-tool I couldn’t even budge it. I managed to lift my workbench slightly off of floor in the process. This was pretty impressive as my workbench is a couple hundred pounds and screwed to studs in two walls.
The front sight was canted so I knew it was probably over torqued but it was worse than I expected.
After a few more tries and a can of liquid wrench, I gave up and ordered a torque bar and a heavy long handled PRI barrel wrench.
Even with the new tools ,the barrel nut wouldn’t budge. Before I broke out the saw I thought I’d give a trick I read about a try. Science suggests steel (the barrel nut) contracts less than aluminum (the receiver) when frozen. So I tossed the whole upper in the freezer overnight with the jäger and my wife’s homemade Popsicles.
Luckily that was just enough to break the nut free and was able to move on to installing my ALG rail, which was much easier.
If I were to do it again I would have ordered the more expensive geissele reaction rod as it has nice flats built into it. The flats would make it a little easier to work with.
The internet is full of speculation as to what the “best” co-witness is for your red dot and iron sights. Frankly there is no right answer, you have to decide what works best for what you are trying to do with your rifle.
First of all what is co-witness? Sights should always be co-witnessed, which means that the iron sights and the dot are zeroed at the same distance. Zero the irons, zero the dot and they should both point at the same place. The decision point is in determining if you prefer Absolute Co-witness or Lower 1/3. The choice really comes down to what optic mount height you chose, the irons will stay the same height.
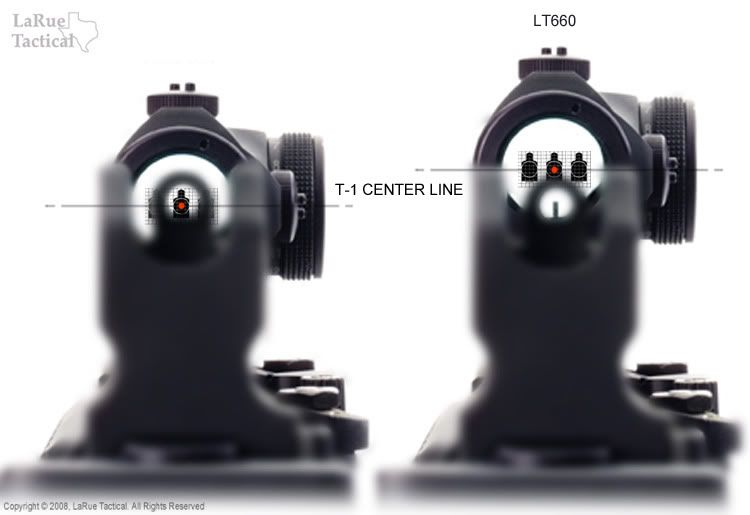
Lower 1/3 Co-witness is just like it sounds, the iron sights (specifically the front sight) will be in the lower 1/3 of the optic. The idea behind this is the shooter can look over or flip down the rear sight and have a “less cluttered view” but, more on that later.
Absolute Co-Witness means the front sight is in the middle of the optic. The idea here is cheek weld is the same for both sighting methods. This is the method I prefer. As you can see below it is not as cluttered as some suggest.
I’ve gone a step further than most with absolute co-witness. As I am a believer in marksmanship with iron sights, I use a fixed rear sight in conjunction with an Aimpoint T1. I’m not a tactical trainer, but I like being able to keep my head in the same place to use both.
The LMT rear sight allows me to use the irons to shoot known distances using the elevation knob and the red dot allows me to acquire targets faster and shoot from weird positions. Best of both worlds in my humble opinion.
There are some things the shooter will need to “be smart” about with this set up.
1. For taking quick shot, use the dot. Don’t try and line up the irons.
2. Focus on the target if using the dot, focus on the front sight if using the irons.
3. Use the 0-2 aperture once the zero has been established, the smaller aperture is too slow for quick target acquisition. If there is time to dial in a known distance, there is time to flip the aperture to the small side.
Larue Tactical offers two very nice Aimpoint Micro mounts: the LT751 (absolute) and LT660 (lower 1/3). Both are solid mounts and they have a nice quick detach leaver and repeatable zero. See the mounts here.
They have an interesting picture that they use to try to make the case that with an absolute co-witness, part of the target will be blocked. Compared to the pictures above I’m not sure that is an honest description. The eye should be close enough to the rear sight that it is almost entirely blurred out especially with the 0-2 aperture. Even with the shooters’ head all the way at the rear of the stock, the sight will not block the target as pictured below.
In my opinion, it all boils down to the user knowing when to line up the irons and when to rely on the red dot.
Picture linked from this thread http://beta.ar15.com/archive/topic.html?b=3&f=18&t=542595
A Whippet shotgun is simply a sawed-down Remington Model 11 semi-automatic shotgun – a weapon made infamous by Depression-era gangsters. The term “Whippet” originates from the Old West, referring to a short shotgun that could be concealed under a coat and “whipped” out quickly when needed. In the 1920s–30s, outlaws embraced the Whippet concept for its deadly surprise factor. By cutting down the Remington Model 11 (the American-made variant of John Browning’s Auto-5 shotgun) into a compact form, criminals could carry a powerful 4+1 shot semi-auto in hiding and produce it in an instant during a heist or shootout. This made the Whippet a preferred close-quarters “ambush” weapon for gangsters who wanted more firepower than a typical sawed-off double-barrel.
The Whippet’s defining features were a drastically shortened barrel and a trimmed-down stock, often cut just behind the pistol-grip area. This gave up any semblance of accuracy at range or comfortable recoil control, but it created an easily concealable scattergun ideal for surprise attacks. The Barrow Gang (led by Clyde Barrow and Bonnie Parker) became most associated with the Whippet. In fact, all of the Model 11 shotguns captured from their gang had been shortened for concealability. Bonnie Parker’s personal Whippet, a 20-gauge Model 11, achieved infamy and set the template – so much so that “Whippet” in gangster lore now specifically evokes the Bonnie and Clyde shotgun.
Bonnie and Clyde’s Favorite Firepower
Bonnie Parker playfully aims a cut-down Remington Model 11 “Whippet” at Clyde Barrow during one of their staged photo ops (recovered from the gang’s hideout in 1933). This iconic image helped cement the Whippet’s legend in Bonnie and Clyde’s story.
Out of their entire arsenal, Bonnie Parker favored a cut-down Remington Model 11 as her weapon of choice. She was a petite woman (4’11”, ~90 lbs), and the light recoil of the semi-auto 20-gauge Model 11 made it manageable for her. Photographs recovered by police famously show Bonnie “playfully” pointing a Whippet at Clyde’s chest, grinning as he raises his hands in mock surrender. In these now-legendary snapshots, Bonnie’s barrel is clearly sawed off short and the stock cut down, illustrating how the gang customized their guns. Clyde Barrow also put Whippet guns to use – gang members had 12-gauge versions of the Model 11 as well. Clyde casually referred to these sawed-offs as “Whippet guns” and appreciated that he or Bonnie could hide them under a coat and “whip” them out for an intimidation factor.
The Barrow Gang carried an intimidating arsenal on their crime spree. Clyde’s true love was the Browning Automatic Rifle (BAR) for its rifle-caliber firepower, but the Whippet served as the duo’s close-range trump card. In one notorious incident in April 1934, two highway patrolmen approached a stopped car near Grapevine, Texas, not realizing it was the Barrow Gang. Clyde and an accomplice opened fire, mortally wounding the officers; Bonnie then stepped out with her cut-down shotgun and executed both men at close range, according to eyewitness reports. This ruthless use of the Whippet added to Bonnie’s fearsome reputation (even though some gang members later disputed who fired). It’s clear, however, that Bonnie and Clyde were willing to unleash the Whippet’s deadly blast on anyone who threatened their freedom.
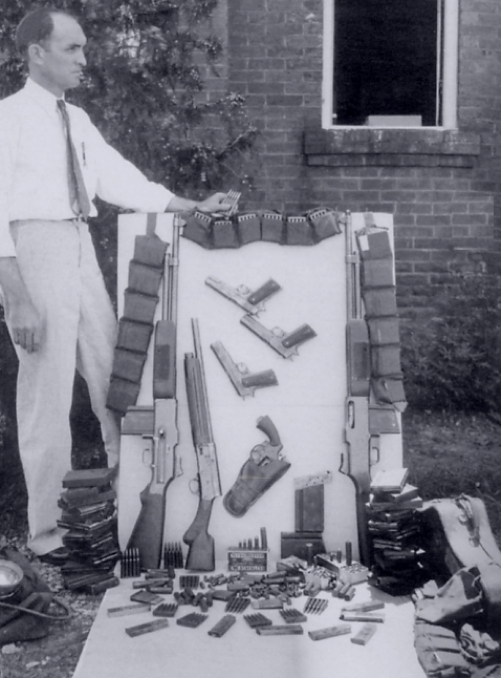
Their crime spree finally ended in a deadly ambush on May 23, 1934. A posse of Texas and Louisiana lawmen riddled the couple’s Ford V8 with bullets, killing Bonnie and Clyde in a storm of gunfire. In the car, officers found a small arsenal fit for a war. Among the weapons inventoried were three BAR rifles, several handguns, a Winchester 10-gauge shotgun – and Bonnie’s “Whippet”: “One sawed-off 20-gauge Remington Model 11 shotgun (Bonnie’s favorite)”. The whippet lay on the floorboard next to Bonnie’s lifeless body, a grim testament to her final stand.
Lawmen display the arsenal recovered from Bonnie and Clyde’s “death car” in 1934. Among the guns were Clyde’s Browning Automatic Rifles and Bonnie’s sawed-off Remington Model 11 Whippet (visible at right).
This trove of weapons highlights how heavily armed the gang was. In total, authorities pulled over a dozen firearms and thousands of rounds from the bullet-riddled Ford. The Whippet shotgun, though crude in appearance, had earned its place alongside the BARs and Colt handguns as a tool of the Barrow Gang’s bloody trade. The image of Bonnie Parker with a cigar in her mouth and a cut-down shotgun in hand became an enduring symbol of outlaw glamour and violence in Depression-era America. It also illustrated why law enforcement of the day was so outgunned – a semi-automatic 5-shot shotgun, easily concealed, gave criminals a major edge in close quarters, prompting police to respond with equally heavy firepower in the end.
Inside the Remington Model 11: John Browning’s Semi-Auto Design
The Remington Model 11 was the first successful semi-automatic shotgun produced in the United States, and it owed its pedigree to John Moses Browning’s Auto-5 design. Browning developed the Auto-5 in the late 1890s as a long-recoil operated shotgun – an ingenious system where the barrel and bolt recoil together after a shot, then separate to eject and reload. Remington secured licensing to produce this shotgun (after FN in Belgium made the original Auto-5), and from 1906 to 1947 Remington turned out thousands of Model 11s for sport and military use. It came in popular gauges (12, 16, and 20 gauge) and featured a distinctive “humpback” receiver profile. Notably, the Remington version lacked the magazine cut-off found on the Belgian Brownings, but in most respects it was nearly identical to Browning’s Auto-5.
Why did the Barrow Gang pick the Model 11 for a Whippet? A key reason is that Browning’s long-recoil action is not dependent on barrel length for reliable cycling. Unlike gas-operated shotguns, which need a certain barrel length or gas pressure to function, the recoil-operated Model 11 could still autoload even after having its barrel severely shortened. This made it one of the few semi-autos of the era that a gangster could cut down to “whippet” size and still get multiple shots off without manual re-cocking. As one historian noted, the Model 11’s design “lent itself to stubby barrels,” since it would keep cycling regardless of the chop job.
At full size, the Model 11 was a popular riot and guard shotgun (the U.S. Army even bought some for WWI trench use). It held 4 shells in its under-barrel tube magazine + 1 in the chamber, giving five rapid shots – a major advantage over the common double-barrel or pump shotgun. Bonnie’s choice of the 20-gauge version likely reflected her small stature; the 20ga Model 11 has gentler recoil, and coupled with the semi-auto action (which absorbs some recoil in the mechanism), it was “light and handy for her”. Clyde and other gang members also acquired 12-gauge Model 11s, which would hit harder but kick more. The gang obtained their guns through theft – for example, Clyde famously stole multiple BARs from National Guard armories, and they similarly stole or “acquired” Model 11s from hardware stores, guards, or farmers as they roamed. By 1933, candid photos show W.D. Jones (a Barrow gang member) posing with a Whippet Model 11 and other guns, indicating the group had several Auto-5/Model 11 type shotguns in their collection.
Technically, the Model 11 had two recoil springs: one in the forearm (with friction rings to adjust for load power) and a secondary spring in the buttstock that pushes the bolt forward. This second spring’s length limits how short you can cut the stock before impairing the action. But in practice, a crafty gunsmith (or Clyde Barrow with a hacksaw) could remove most of the wooden butt and still leave the recoil spring tube intact enough for the gun to cycle. The Model 11’s robustness under abuse – able to fire five shots as fast as the trigger could be pulled – made it ideal for outlaws on the run.
Converting the Model 11 into a “Whippet”
To create a Whippet from a Remington Model 11, the Barrow Gang performed some simple but drastic modifications. First, the barrel was sawed off nearly to the end of the magazine tube (in some cases as short as 12–15 inches). Clyde Barrow reportedly “cut his all the way back to the magazine tube” on one shotgun. This reduced the overall length dramatically and allowed the shotgun to be concealed under coats or even along a leg. Next, the wooden buttstock was cut down to a short pistol-grip stub, removing the shoulder stock. Contemporary descriptions note that Bonnie’s 20-ga Model 11 had its stock “cut off just behind the pistol grip.” The result was essentially a stockless, pistol-grip semi-auto. Such a cut would have exposed or shortened the recoil spring tube in the stock – possibly rendering the semi-auto function unreliable – but it’s likely Clyde left just enough of the tube in place to keep the action working. Indeed, the Whippets captured from the gang did continue to function autoloading, showing that the outlaws knew how to chop a gun just enough.
Shortened Barrel: By cutting the barrel down (often to around the magazine’s end), the Whippet became extremely maneuverable in tight spaces. It could be hidden under a long coat, or even under a trouser leg as Clyde allegedly did. The shortened barrel produced a wide shot spread at close range – useful for ambush, though ineffective beyond a few yards.
Cut-Down Stock: Removing the stock made the shotgun much easier to conceal. Bonnie’s Whippet had no butt to shoulder; she likely fired it from the hip. The lack of a stock made aiming harder and recoil more punishing, but in the close confines of a car or small room, this hardly mattered. Clyde went a step further by attaching a makeshift sling: he cut a strip of rubber from an inner tube and “tied it to the cutoff stock,” creating a loop for his arm. With this elastic band around his forearm under a coat, the Whippet would hang hidden along his side. When he went to draw it, “the rubber band would give when he snatched it up to fire,” helping him bring the gun to bear quickly. This clever trick pocket (or breakaway trouser pocket) is a testament to the gang’s ingenuity in concealing heavy weapons.
Firepower at the Ready: A Whippet retained the Model 11’s 5-shot semi-automatic capability. This meant Bonnie or Clyde could unleash five blasts of buckshot in rapid succession – a devastating wall of fire at close range. By comparison, a deputy’s typical shotgun of the time was a pump-action or double-barrel, much slower. As one account notes, “the autoloading nature of the design ensured that the gun offered prodigious close-range firepower.” In practice, the Whippet could keep multiple lawmen pinned or wounded in seconds, allowing the gang to make a frenzied escape.
Despite the brutal recoil and muzzle blast one would get from a hacked-down shotgun, the Barrow gang found the Whippets quite effective. At the ranges they used them – often 10–20 feet, firing from the hip – fine aiming was unnecessary. In fact, testers of a modern replica found it “not a chore to keep your rounds on a man-sized target out to 15 meters or so, even firing from the hip”. The psychological impact of a Whippet should not be overlooked either: the sudden roar of a semi-automatic shotgun and the sight of a tiny woman like Bonnie blasting away with a 20-gauge had a terrorizing effect on witnesses and lawmen alike. One gang member said of Clyde’s cut-down guns, “when he pulled it, people scattered,” referring in that case to his shortened BAR. The same surely applied to a Whippet belching buckshot.
Of course, the Whippet was a weapon of desperation and surprise, not sustained combat. Its spread was too broad for distance, and without a stock, accuracy beyond a few yards was poor. But Bonnie and Clyde rarely engaged in protracted gunfights – they used the Whippet as a shock weapon to get the drop on opponents and blast their way out of traps. The Grapevine killings and other close-range encounters show how lethal the cut-down Model 11 could be in their hands. Conversely, when the lawmen finally ambushed them, they also employed overwhelming fire (including Model 8 rifles and shotguns) to ensure the pair had no chance to reply. The era of the gangster “whippet gun” was short-lived, but it left a lasting impression.
Legacy and Lessons
The infamous career of Bonnie and Clyde – and the role of the Remington 11 Whippet in it – had a direct impact on American gun law and culture. In 1934, shortly after the Barrow Gang’s demise, the U.S. enacted the National Firearms Act (NFA), which among other things regulated short-barreled shotguns like the Whippet. No longer could anyone hacksaw a shotgun down to concealable size without federal paperwork and taxes; the era of the gangster DIY shotgun was effectively over. The Whippet guns of Bonnie and Clyde, along with the Tommy guns and BARs of other outlaws, spurred law enforcement to even the odds through legislation. By making such weapons illegal to possess without serious hurdles, the NFA aimed to prevent future criminals from easily arming themselves as heavily as the Barrow Gang had.
Yet, the legend of the Whippet shotgun lives on in popular culture and historical lore. The sight of Bonnie Parker with her smoked shotgun and cigar has been reproduced in films (like the 1967 Bonnie and Clyde movie) and books, cementing the Whippet as a symbol of 1930s outlaw rebellion. Firearms enthusiasts today still talk about and even recreate Whippets. Modern gunsmiths and collectors have built legal Whippet clones – often by starting with a beat-up Remington Model 11 or Browning Auto-5 and cutting it just to the legal limits (barrel ≥18″, overall ≥26″) so no NFA violation occurs. These replicas give a hands-on sense of what Bonnie and Clyde had. According to one such experimenter, the finished gun “looks cool and functions fine…keeping rounds on target firing from the hip” at close range. The consensus is that the Whippet is as unwieldy as it is intimidating – certainly not a practical firearm by modern standards, but undeniably a thrilling piece of Americana to shoot.
At Garand Thumb, we had the opportunity to handle a Whippet clone up close, and it was a surreal experience. Feeling the heft of the shortened Model 11 and imagining Bonnie Parker hiding it under her trench coat gave new appreciation for the guts (and recklessness) of those 1930s gangsters. The Whippet’s legacy is one of innovation born from necessity: it was a brutal solution for a desperate time. Well over 90 years later, Bonnie and Clyde’s Whippet remains a fascinating historical firearm – a testament to how a standard sporting shotgun was transformed into a notorious underworld weapon. Through well-sourced research and hands-on exploration, we remember that the Whippet shotgun was not just a tool of crime, but also a catalyst for change in gun laws and an enduring legend among firearm enthusiasts and history buffs. The story of the Remington Model 11 Whippet truly exemplifies how ingenuity and violence intertwined during the tumultuous gangster era, leaving behind lessons that still resonate in America’s firearm heritage.
Sources: Bonnie and Clyde historical accounts; Small Arms Review on Bonnie’s Whippit shotgun; GAT Daily – Guns of Bonnie & Clyde; Wideners Historical Blog; Wikimedia Commons (public domain images and FBI records).
Original Post from 2011:
A friend of mine was nice enough to let me check out his Remington Model 11 “Whippet clone.”
A whippet is simply a sawed down Remington model 11. The term Whippet specifically refers to Bonnie Parker’s 20 Gauge which was cut down so it could be concealed and then Clyde or her would “whip it out” from under their jacket for a devastating ambush.
This famous picture shows Bonnie demonstrating the whippet on Clyde.
Bonnie and Clyde’s whippet was found in their shot up V8 Ford after their death. Along with Clyde’s infamous sawed off BAR.
The clone I shot was a 12 gauge model 11. Originally made in 1912, its owner acquired it in poor shape and cut it down, to legal length.
If you are going to make your own Whippet clone watch out for the recoil spring assembly which extends into the stock.
A whippet is a fun gun to shoot and represents a wild time in our history. The recoil is aggressive but in the right situation it could serve reasonably well as a self defense gun.
Testing the Whippet out at the GTB testing laboratory, turns out its not a very good clay gun.
Check out Rob Reed’s article over at the examiner for more on Bonnie and Clyde’s guns.