Smith and Wesson M&P Model 15 conversion from DAO to DA/SA

I picked up an old police trade in S&W a couple years ago at had been converted to double action only (DAO) for police use. This was a “lawyer” modification police departments did to prevent accidental shootings. The Model 15 is a medium sized K frame and was a common police revolver up until he polymer guns took over, some still remain in service. This particular revolver was made in 1968 and was a police trade in. Meaning that a police department was offered to trade their wheel guns in to upgrade to a more modern pistol, probably M&P 40 cal or 9 mms.

I wanted to convert this “back” to DA/SA for something to do. Some argue that other than target shooting you’ll rarely use single action, which may be true but I wanted to have the option.

20131021-211253.jpg

I ordered a hammer from Numrich who warned me it may require a gunsmith to fit this, in my case it did not but you might not get as lucky.

Here are the hammers the one on the left is the “old” DAO hammer the one on the right is the SA/DA. The hammers are new old stock.

20131021-211620.jpg

First, of course, open the side plate. I put a little masking tape on my screw driver to protect the screw head. Do not pry the plate off, I was able to just turn the revolver sideways and tap it with my hand and the plate fell free.

20131021-212324.jpg

At this point I stopped and drew a little picture of what I saw inside and took the opportunity to clean the 40 years worth of gunk built up inside.

I only removed the minimum amount of parts I could to get the hammer free which were the mainspring and the hammer block. Then he hammer just lifted out.

20131021-213305.jpg

Then I dropped in the new hammer with the SA notch. The easiest way to do this was to pull the trigger all the way back then it slides right in. I pulled the trigger a time or two until it lined up right. I had to push the hammer forward after pulling the trigger since there are no springs .

20131021-213807.jpg

To put the spring in I unscrewed the screw on the front of the grip. It seemed to work best to put the bottom on the spring in the bottom of the grip attach it to the hammer then tighten the screw.

20131021-213910.jpg

Putting the plate back on is a bit of a challenge. I struggled to line up the “hammer block” after first managing to put the plate on without the hammer block I finally got it done by holding the plate flat with the hammer block sitting in its grove. then I manipulated the frame until it snapped in.

Then it was simply a matter of putting the screws back in and function testing it.

I’ve had this revolver for about three years now since I converted it to DA/SA. Years later I’m glad I did. In PA we can’t hunt with semiautomatics, while I don’t hunt with the K Frame, I have taken it with me for the past few rifle seasons. It’s a great shooter, the trigger is very smooth and the heavy steel frame combined with 38 special makes recoil almost unnoticeable. I will sometimes carry it in a Raven Concealment Phantom.

20131022-204739.jpg

If you get a chance to pick one of these old wheel guns up at a decent price you won’t be disappointed.

L.E. Wilson Case Trimmer Review

I’ve been through a couple of trimmers over the years, a RCBS trim pro and a WFT. Around a year a go I also picked up a L.E. Wilson case trimmer.

20131017-195645.jpg

Both the RCBS and the WFT have pros and cons, and have their place. I did a review of the WFT here..

The Wilson trimmer is unique in that it has different cartridge specific case holders. As opposed to the shell holders on more traditional timers, like the RCBS trimpro, which grip the base on of the case. The case holders on the Wilson trimmer balance on the rails of the trimmer between the cutter and support the case so that it makes contact with the cutter on one end and the stop screw on the other. Eliminating case rim as a contact point keeps the case length more consistent.

20131017-210059.jpg

Set up and use is fairly simple. Adjusting the stop screw changes the case length and there is a set screw to lock the stop screw.


20131017-210249.jpg

To use it.

– Inset a case into your case holder
– Tap it in on a hard surface to secure the case
– Place the case holder on the rails
– Push the cutter against the case
– Keep your hand on the case holder keeping the base firmly against the stop screw
– Run or spin the trimmer while gently rotating the case holder on the rails.
– Stop when you hear/feel the case no longer being trimmed
– Tap the case out of the holder and repeat.

I have the drill attachment for mine and I mount it in the jaws of my vice. This set up is pretty handy for me but there are several different accessories to chose from.

20131017-210447.jpg

Review:

I love this trimmer. Compared to the other timers I’ve tried this is far easier to set up and more consistent. I easily get less than .001 variation. It is solid once it is so there is no “drifting” like I experienced with other trimmers, so there is no second guessing. It’s so consistent that I am comfortable only measuring every 10 cases or so. I’ve never found one off more than .001.

There are only two minor “cautions” I have for this trimmer. First, be careful when holding the case holder if you let it jump the rails you can mess up the case or worse cut yourself on the cutting head, so pay attention. Second and this is really minor, keep it out of the humidity it will get surface rust quickly, I keep mine in a ziplock bag and spray it with CLP when I am done.

Bottom line it’s a constant well made tool which makes a tedious process a bit more enjoyable.

A quick video on how to use this trimer

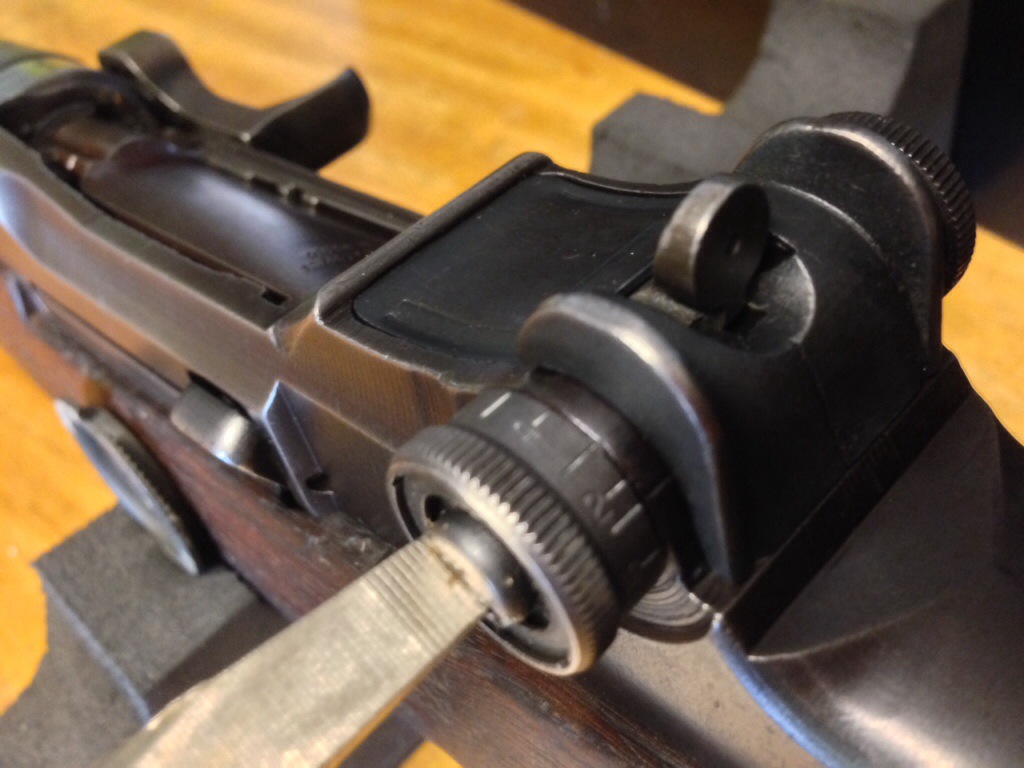
Setting The Elevation Knob On A M1 Garand

There are a few different ways to set the elevation knob on a Garand floating around. Before setting this you will first need to determine what the correct amount of clicks is for your rifle to hit the X ring.

This is how I do it:

1. Run the rear sight all the way down.
2. Loosen the elevation knob screw.
3. Continue turning the knob down until you reach your desired hashmark.
4. Continue turning the knob down counting to your desired number of clicks.
5. Tighten the elevation screw without moving the knob.
6. Turn the knob up verifying that when you have reached the number of clicks you were looking for it stops at the desired hashmark.
7. Run the rear sight all the way up and tighten the elevation knob screw all the way.
8. Return the sight to zero and go shoot in a local match.

A fair amount of competitors don’t bother with this and just count clicks. It can be a useful practice as it helps you verify at a glance you are at the right elevation. However, on the other hand, I have had the rear sight loosen up on me and cause the elevation to appear correct but the number of clicks had drifted. Best practice is probably “trust but verify” and set your your elevation knob to the right hashmark but verify from time to time, at least before each match. It is also a good idea to write your elevation and windage down on a card and place it in your stock.

20131013-210612.jpg

Replace Clip Latch Spring on a M1 Garand

The clip in one of my Garands was ejecting too soon. While this can be a byproduct of Greek clips, it’s easier to just replace the spring. Replacing this should clear up any premature ejection issues.

20130921-195250.jpg

It’s a pretty simple operation. Take the trigger assembly out and remove the lower stock. I use a heavy duty clip latch spring from Brownells.

20130921-195815.jpg

Use either a small punch or a M1 Garand combo tool to start pushing out the clip latch pin. It shouldn’t require much force to get it started.

20130921-200921.jpg


Once there is enough of the pin sticking out pull it out the rest of the way by hand. There may be a little spring tension here so be careful nothing goes flying.

20130921-201420.jpg

Then remove the existing spring from the clip latch and replace it with the new spring. The “fat” end of the spring should snap into the clip latch.

20130921-201624.jpg

Then replace the clip latch and replace the pin.

20130921-201918.jpg

Push down on clip latch and push in the clip latch pin.

20130921-202018.jpg

You can do this without totally field stripping your rifle just make sure the op rod catch is in the down position and the action is closed. Otherwise it will be difficult to reinsert the clip latch. Of course make extra sure your rifle is clear before attempting any of this.

20130921-203014.jpg

CMMG A4 22 Upper Range Report

A couple months back I picked up a CMMG A4 22 upper. I had backordered it and frankly I had not expected it to come so soon and I was thinking about canceling it and getting an air rifle upper instead. I’m glad I didn’t!

20130819-214312.jpg

I hope to use it to get more practice for Highpower. I use the same lower as I do on my service rifle, so it has the same feel and Geissele trigger. Additionally, I use the same Turner 1907 sling, black dog magazines and topped off with a Rock River NM carry handle. While perhaps a little extravagant for a 22 upper but I wanted a good quality hooded sight that would feel the same as my White Oak A2.

It worked well, I ran out of daylight before I could get it in the black however I am happy with its performance. It fed and shot well, especially for 20+ year old 22 that’s been in the back of my gun safe as long as I can remember.

20130819-215031.jpg

20130819-215141.jpg