Crosman MAR177 AR-15 Upper Review

Several years ago Crosman introduced the MAR177 upper. It’s a match grade A4 style upper that fits on a standard AR-15 lower. The advantage, to me, is this upper fits on the same lower I use for High Power. So it has the same weight,  same Geissele national match trigger, and overall feel as the rifle I use for High Power.

20150212-195634-71794824.jpg

As far as the upper itself, i’ts solid and easy to use. It comes with a ten round magazine (they call it a clip). I use a single feed tray as I intend to practice mostly on slow fire off-hand. It is not semi auto so there is an AR-15 style charging handle which is pulled between shots to reset the trigger and air system.

20150212-191403-69243838.jpg

The MAR177 is a Pre-Charged Pneumatic (PCP) so it has an on-board air tank that needs to be charged with either a pump, a scuba tank, or a special compressor. I picked up a Benjamin hand pump which resembles a bicycle pump. While cocking a Red Rider BB gun between each shot, filling the tank using this pump can be a bit of a work out. I figure that I can work on my upper body strength and my off hand at the same time.

20150212-195423-71663069.jpg

I intend to use this to get some indoor trigger time over the winter break before the spring matches (tomorrow’s high is 12 degrees). Since a trip to the range tends to eat up the better part of the day, the MAR177 allows me to squeeze a few rounds in any time I can spare a few minutes. This should cut down on the excuses I make about my lack of practicing.

While I do not intend to take it to any air rifle matches, at least not just yet, I impressed with its performance during some quick range time this evening.20150212-191404-69244894.jpg


This wouldn’t be a fair review if I did not mention the out of the box issue I had with the MAR177. Upon delivery the upper would not hold a charge meaning there was a leak behind the gauge. However, I contacted Crosmen who responded within 30 minutes with a shipping label. They had it replaced and back to me working 100% in 8 days round trip. Which frankly is better than the service I have received from some well regarded firearms manufactures. Despite the out of the box issue I had, I would not hesitate to recommend this upper to anyone looking to get some more trigger time.


Freezer Match 2015

Took the M1 Carbine out for the freezer match. This is a “fun match” our club runs, any rifle, any sight. I took out my M1 Carbine as had not had much trigger time with it yet.

It was a nice crisp day in the low 30’s and a little overcast. The match was a 40 round off hand match. I had never so much as fired my carbine off hand so I did about as poorly as I had expected to do. But this was a good start towards getting the hang of shooting this thing.

Unfortunately on my last target the lug on my M1 Carbine flat bolt sheared off so I wasn’t able to finish the match. There are picture below of the broken bolt.  It seems I have some work to do on this carbine before Perry.

All and all it was a great match, there was chili, coffee, and door prizes with the benefits going to charity,  I’ll need to keep practicing during the off season. The National Matches will be here before I know it!


20150125-191404-69244119.jpg20150125-191405-69245111.jpg

The Broken Bolt:

20150125-201853-73133789.jpg

20150125-201852-73132788.jpg

20150125-201854-73134722.jpg

How To Use a 1907 Sling

A sling is more than just a strap to carry the rifle. Properly using a sling can provide a sturdy shooting platform.

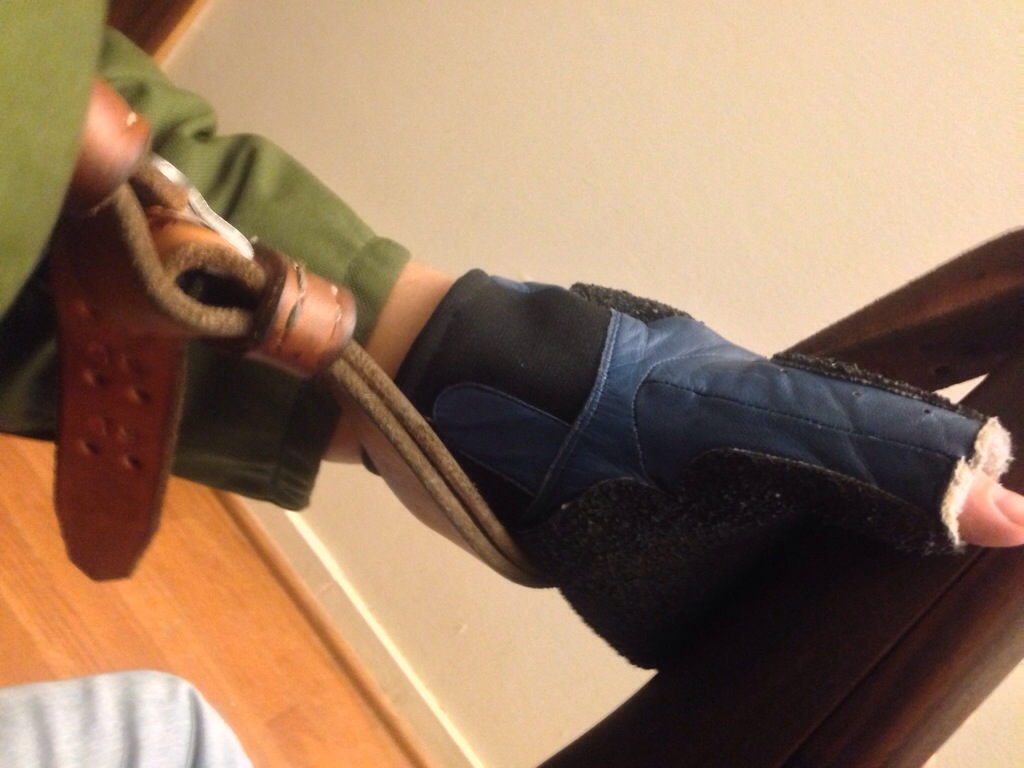
I prefer a Ron Brown 1907 sling. While slower to sling up, I feel more stable with a 1907 over a web sling.

The sling pictures is a John Weller 1907 I picked up at Camp Perry a couple years ago. Sadly John passed away since then and these slings are no longer made. Ron Brown slings, sold by Creedmoor sports are the best slings on the market. They are thicker more sturdy and stretch less than most other slings.

First you will need to have your 1907 installed correctly. CMP has a detailed write up on this below that can help get you started. However, they do it wrong. Put the frogs facing in towards the rifle. As you’ll see below this will put the frog on the top when slinging up which is easier to manage and less likly to slip.

http://thecmp.org/training-tech/armorers-corner/1907-sling-installation/

20141224-153224-55944504.jpg

Once the sling is set up correctly remove the frog on the short strap (aka tail) of the sling from the looped long strap. Then pull it free from the rear sling swivel.

Adjust the sling so there is a large enough loop to fit your arm in. Pull the upper keeper away from the frog so that it is easier to adjust.

20141224-153221-55941085.jpg

Turn the loop clockwise so that the loop faces you. The frog should be facing more or less to the left or away from the rifle. Be careful not to do this step twice in haste and get the sling twisted.

Then stick your support arm through the loop.

20141224-153221-55941955.jpg

Push the sling up your arm as far as it will go. There is some amount personal preference here. The key is to do it the same every time. I use the pad on my jacket as a reference point.

Once you have the sling all the way up draw it as tight as you can. I do this by pulling on the lower half of the loop with my left hand and holding the upper half of the loop with my right hand.

20141224-153223-55943621 (2)

Once the sling is nice and tight, slide the upper keeper all the way down to the frog which will lock it all together.

20141224-153225-55945388.jpg

Then you are ready to  go. Place your support hand over the sling and grip the stock.

20141224-153226-55946209.jpg

You will need to determine what the best length and support hand position Is for you. Rig up, get into position and dry fire a few times until you feel comfortable.

10255428_10152615206264669_1969578304801705464_n

My left handed wife informs me I should add that this depicts a right handed shooter.

Shoot by wire?

Over at guns.com they ran a story about a new digital trigger prototype. There is not a lot of info on how it works other than “an electronic signal releases the trigger.” From watching the video below I’d speculate it’s activated when the trigger which just pivots on the trigger pin and spring hits the little blue button behind the trigger.

This certainly won’t be service rifle legal in the foreseeable future. Electronic triggers are not uncommon in the paintball/airsoft world it will be interesting to see if they catch on outside of a novelty . What do you think?

[yop_poll id=”4″]


Video linked from Guns.com you tube channel

Leveraging the Laws of Thermodynamics to Remove a Stuck Barrel Nut

I picked up a nice free float rail from ALG defense, so I needed to take the barrel off of my Palmetto State Armory (PSA) mock dissipator. Sounds easy right? Well not so much. Using my improvised upper clamshell and multi-tool I couldn’t even budge it. I managed to lift my workbench slightly off of floor in the process. This was pretty impressive as my workbench is a couple hundred pounds and screwed to studs in two walls.

The front sight was canted so I knew it was probably over torqued but it was worse than I expected.

After a few more tries and a can of liquid wrench, I gave up and ordered a torque bar and a heavy long handled PRI barrel wrench.

20141002-204711-74831340.jpg

http://www.brownells.com/gunsmith-tools-supplies/rifle-tools/barrel-tools/ar-15-m16-308-ar-barrel-extension-torque-tools-prod27452.aspx

http://www.brownells.com/gunsmith-tools-supplies/rifle-tools/wrenches/ar-15-m16-ar-10-barrel-nut-wrench-prod27412.aspx

Even with the new tools ,the barrel nut wouldn’t budge. Before I broke out the saw I thought I’d give a trick I read about a try. Science suggests steel (the barrel nut) contracts less than aluminum (the receiver) when frozen. So I tossed the whole upper in the freezer overnight with the jäger and my wife’s homemade Popsicles.

20141002-205954-75594420.jpg

20141002-205955-75595317.jpg

Luckily that was just enough to break the nut free and was able to move on to installing my ALG rail, which was much easier.

20141002-210159-75719591.jpg

If I were to do it again I would have ordered the more expensive geissele reaction rod as it has nice flats built into it. The flats would make it a little easier to work with.

20141002-210800-76080055.jpg